 |
Reptile Forum, Reptile Classifieds - CaptiveBred
A site to share your Reptile experiances & ask questions
|
| View previous topic :: View next topic |
| Author |
Message |
grimesy
I've settled in...
Joined: 13 Nov 2005
Posts: 28
Location: Manchester UK
|
 Posted: Fri Nov 18, 2005 3:00 am Post subject: Super viv... any suggestions Posted: Fri Nov 18, 2005 3:00 am Post subject: Super viv... any suggestions |
 |
|
ok i want to build an awsome vivarium for my bearded dragons (1male n 1 female... but as soon as i find the right breeder with awsome colour morphs this will go up to 1male 3 females.) i want to build an awsome viv with a lot of technology (well habistat stuff lol) so i can simulate my ausie friends natural enviroment very acuratly... And give them basicly a viv mantion.
I'll type up a list of the matirials/equipment ill think i need please please.. stick your pennys worth in and let me kno what products are best suited for my requirements as i start to get the project off the ground, I'll take pics n post em to keep you all up to speed .
my start off budget is around £600... any ways lets get on with it.
Dimentions: 72" X 36" X 60" ( i want them to have as much space as possible..but dont want to cause issues like UV light out of reach of them and so on.)
im not entirly shure what matirials to use to build this viv.... maybe MDF or all perspecs (no idea how you attach perspecs) or a fancier wood that will help retain heat.
a fine metal mesh top for light's
on to the equipment,
- Habistat heat mat (890X280 35"X 11" 42 watts) <--- will this be ample?
- blue dayLight spot lights (bayonet fitting, 100 watts) X2 or is 100 watts to high for this?
- Pearlco 60/100 watt spot reflector's X2
and would it be an option to purchase Arcadia Compact lamp reflector insted?...and do they come with bulbs can u evan use other brands bulbs?
you reckon i should purchase an IR lamp aswell for night time air temp?
- Zoo Med Repti-Sun (5.0 UVB 48" 1.5" dia)
- Arcadia UV starter (40W 1.5" dia 48")
- Arcadia UV Reflector (48")
- Habistat Sun/Moon twin optical switch
- Habistat Cool control
- Habistat Mini Fan
- Habistat Dimming Day\Night
- Habistat Pulse Prop Day/Night
- Digital in/out, min/max therm/Hygrometer
- Digital timer (For Uv) <--- preferable one with memory and the ability to program diffrent on/off hours for diffrent times of the year.
Decoration.... well we'll hit that another time but its gonna have a molded rock sides and background.
ok thats what im aiming to do ppl... dont be shy any suggestions are more than welcome.
thanks for your time... James
P.s. here's a concept|:-
Last edited by grimesy on Sat Nov 19, 2005 4:43 am; edited 1 time in total |
|
| Back to top |
|
 |
Scott W
Site Admin
Joined: 15 Apr 2004
Posts: 13355
Location: London, England.
|
| Posted: Fri Nov 18, 2005 10:03 am Post subject: |
|
|
Hi James,
With that sort of budget and willingness to spend in on your beardies you should end up with a fantastic viv.
So your planning 5ft tall? 6ft long and 30" fron to back? That's great and should allow you to use some real good kit.
I personally would be the viv from Contiboard or MDF, as it's a desert viv you won't have any humidity issues to ruin it.
Once you have built it, i would seal with silicone, then build you fake rock background, making as many basking ledges as you can, little cave type hides and other features. Even aim for the bottom of the fake rock to really stick out into the viv. Once that's all cured you can add electrics.
My suggetion would be to use powersun UV spot bulbs for day time heat with a heat pad buried into the sand substrate. This will allow and encourage them to use the fake rock and branches to climb up and bask under the lamps and also provide a hot spot on the ground with the heat mat, leave this viv running to check it doesn't overheat, so long as you have enough ventilation you should be fine as you viv is very tall. For night time heat I would leave the heat pad on plus have a ceramic on a pulse Habistat come on at night.
The powersun lamps can then just be on a standard timer clock.
Here's a simple diagram. So long as you position the lamps and ceramic at least 12"s away from branches or ledges you should need to put guards over them.
The ventilation, you want to aim to create convection currents, so you can have with the top side vents or the two top roof vents (I would go for roof vents to let more heat out), then have two low side vents, these will draw fresh air in as the hot air escapes out the top, keeping the viv nice and fresh without needing a fan extra.
_________________

Please DO NOT pm orders for reptiles, send email instead scott@captivebred.co.uk |
|
| Back to top |
|
|
grimesy
I've settled in...
Joined: 13 Nov 2005
Posts: 28
Location: Manchester UK
|
| Posted: Fri Nov 18, 2005 4:39 pm Post subject: |
|
|
cheers m8... see im learning know the "balls rolling", i mean i just learnt about convection currents.
so thats another element of the vivariums dynamics for me to consider.
yeah man my plan is to build it and set it up n leave it running for 3-4 days without my BD's being housed in it to make shure there are no temprature spikes... Well! basicaly to iron out any bugs befor the exodus of the dragons.
Also i was planning on sitting the lights on stands a few cm above the metal mesh.
thanks ppl keep it coming... James |
|
| Back to top |
|
|
Nelson
Key Member

Joined: 04 Oct 2005
Posts: 318
|
| Posted: Sat Nov 19, 2005 4:44 pm Post subject: |
|
|
Heres my viv for insparation:
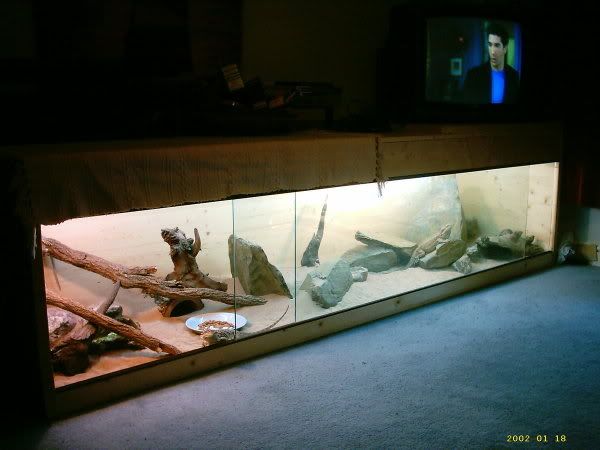
8x2.5x2.5 Houses 1.3 Beardies
This pic was taken approx 1yr ago, and the furnishings are very different now!
I personally dont use any night time heating, but then my viv is in the lounge.
One thought about yours though: Have you though about putting multiple UVB strips in as they could be upto 5' away if their at the bottom. Putting one approx half way down would help. |
|
| Back to top |
|
|
grimesy
I've settled in...
Joined: 13 Nov 2005
Posts: 28
Location: Manchester UK
|
| Posted: Sat Nov 19, 2005 7:17 pm Post subject: |
|
|
Sweet viv m8...
I just went out and got a load of matirials and equipment.
Reptitherm - heat mat (882X274mm 46w)
Zoo Med - Powersun Uv (100w)
Zoo Med - Clamp lamp (deluxe 5½" porcelain reflector)
Zoo Med - Basking lamp (screw, 150w)
Flucker's - Clamp lamp (5.5" metal reflector)
Zoo Med - Nocturnal infrared heat lamp(150w)
Flucker's - Clamp lamp (5.5" metal reflector)
Habistat - Night eye (optical sensor)
Habistat - Dimming thermastat day/night
Habistat - Pulse prop thermastat day\night
Habistat - Cool control
Habistat - Mini fan
Unknown - Digital in/out min/max therm/hygrometer
Unknown - Reptisand (white, 25kg)
-----Materials ------------------------------------------------------------------------
-----
the Dimention of the viv will be 6'x2'x5'.
Peak aquatics - Aquarium silicone (triple strength, 310ml)
Blagdon - V8 pondseal (1litre)
Multichem - Cement (25kg)
Webbflex - PU foam (750ml, gun grade + gun) x7
Universal - Pva glue (5litre)
Specialist - weatherproof wood adhesive (125ml)
SupaDec - White spirit (750ml)
-Glass slides (Plastic 8') x2
-Venear chipboard (Beech) :-
1x - 6' X 2', 18mm (Floor)
1x - 6' X 4', 18mm (Back)
1x - 6' X 1', 18mm (Back)
2x - 2' X 5', 18mm (Sides)
2x - 6' X ½', 18mm (front were runners and glass will be fixed)
(for the back im going to have to use 2 seperate pieces of wood but the smaller of the two will be set to the floor so the top can bare the wight.)
-edge covers (plastic, beech) x 12
-Square beading(¼")
-Glass (3'.1" X 4', 8mm) x2
-Wood dowles x50+
-chipboard screws x50+
-screw cover caps (plastic, beech) x50+
-Cupboard handles (brushed steel) x2
I still have a number of items to collect such as mesh or metal grill, polystyrene ext..
And i have a large veriety of viv funishings like a large Exo terra real stone water dish, a few pieces of Sandblasted root in various sizes and plastic plants.
Im starting building the actual structure of the viv on sunday (19th nov 05) i'll try and sort out a pic for wed. |
|
| Back to top |
|
|
Dan
Captivebred Communist
Joined: 08 Sep 2005
Posts: 1306
|
| Posted: Sat Nov 19, 2005 8:03 pm Post subject: |
|
|
5ft is VERY tall for beardies.
I don't know if it would work but i'd be tempted to put a glass front on the bottom of the viv, maybe 30 inches tall. You could then put substrate in up to the 2 foot mark. Within that substrate you could either make some burrows for the lizards to use or let them create there own. Asking someone like Scott about substrate mixes to find a combination that holds together well enough to support a burrow would be a good idea.
Just my thoughts anyway, and as i said it might not work anyway 
_________________
TFA
The future is bright, the future is a net like pattern.................
I'm NOT an expert, so if you don't want to know my opinion don't ask!! |
|
| Back to top |
|
|
grimesy
I've settled in...
Joined: 13 Nov 2005
Posts: 28
Location: Manchester UK
|
| Posted: Sat Nov 19, 2005 8:55 pm Post subject: |
|
|
thanks for the suggestion dan, the viv will have glass on the front and chipboard (6'x6") for the glass runns to go on i suppose i could easily revise this and change the size of the bottom toe board on the front to allow for the increase in substrate.
but my plan was... ermmm you kno the false rock backgrounds made from polystyrene and grout.
a was going to build the floor up and set a big piece of decrotive root in it like a dead tree. so the floor would have looked like rock to with variations in hight so i could still put sand in (so it would appear as though there was rock buried in the ground) but with your awsome suggestion of putting burrows in the viv 2 i could revise this and build some sort of underground cave that can be buried under the substrate hence supporting the burrow from cavein's.
Also how could i contact scott in regards to mixing my own substrate?
thanks for the advise keep it coming guy n gals... |
|
| Back to top |
|
|
grimesy
I've settled in...
Joined: 13 Nov 2005
Posts: 28
Location: Manchester UK
|
| Posted: Sat Nov 19, 2005 9:04 pm Post subject: decoration |
|
|
I am studying various photo's of areas of inland australia to simulate there natural enviroment as much as possible, also im researching the geology of these area so i can find out what indigenous rocks are found in these areas. to help creating the false rock.
this is the photo im studying to recreate the look for my fake rock background.
[/img] |
|
| Back to top |
|
|
Dan
Captivebred Communist
Joined: 08 Sep 2005
Posts: 1306
|
| Posted: Sat Nov 19, 2005 9:43 pm Post subject: |
|
|
What i meant was instead of using chipboard for your toeboard use glass so you can see into the substrate and possibly one of there burrows. A chunk of fake rock attached to the outside of this toeboard with magnets would give them privacy until you wanted to be nosey and would give the flat front face of your viv some extra dimension.
When it comes to your background, i'd suggest some chicken wire and plastercast (cheap as chips from art shops) to create overhangs etc. This can be covered with grout again to create the right texture. This is a bit more detailed than foam and polystyrene IMO.
If you follow the below link it will take you to an album i put together when i did my communal viv. Start on the bottom pics and work up for it to be in some form of sequence:
http://photobucket.com/albums/v205/debndan/communal/new%20home/
I used foam, polystryrene and plastercast in there. A first for me was the concrete back ground. It was a bag of "post mix" for holding wooden posts, etc in the ground and as a result was full of pebbles and rocks. It is amazing how effective it is, even when mixed with wallpaper paste to seal it and then varnish to waterproof it.
_________________
TFA
The future is bright, the future is a net like pattern.................
I'm NOT an expert, so if you don't want to know my opinion don't ask!! |
|
| Back to top |
|
|
Nelson
Key Member
Joined: 04 Oct 2005
Posts: 318
|
| Posted: Sun Nov 20, 2005 1:47 am Post subject: |
|
|
grimesy that realy is a huge shopping list, and some lovely ideas!
Im very interested to see how this turns out.
And Dan what did you keep in that viv? |
|
| Back to top |
|
|
|
|
You cannot post new topics in this forum
You cannot reply to topics in this forum
You cannot edit your posts in this forum
You cannot delete your posts in this forum
You cannot vote in polls in this forum
|
Powered by phpBB © 2001, 2005 phpBB Group
|

