| View previous topic :: View next topic |
| Author |
Message |
aidan
Captivebred Communist

Joined: 07 Apr 2007
Posts: 1882
Location: ESSEX
|
 Posted: Sat May 05, 2007 9:13 pm Post subject: background Posted: Sat May 05, 2007 9:13 pm Post subject: background |
 |
|
| how do i build a back ground. I've heard its expandable filler and then you put a mixture over it of concrete or something like that can someone fill me in on how to make these |
|
| Back to top |
|
 |
Mich
Contributing Member
Joined: 05 May 2007
Posts: 59
Location: Barking, London
|
| Posted: Sun May 06, 2007 12:33 pm Post subject: |
|
|
if you have a search around in the vivarium design section you will find lots of peoples step by step design plans but here's the basics
1. polystyrene
- shape your polystyrene anyway you want to build walls, floors, ledges, caves etc.
- stick it together with no more nails, some people use small pieces of wood to push through to hold ledges securely
- (note) the first couple i made i used offcuts of polystyrene that i got from fridge packaging/george foreman packaging etc, the latest one I made I bought sheets of polystyrene from B+Q (only about £5 for a huge sheet) and it made it much easier to work with
2. expanding foam filler
- this stuff can be used to give lumpy effects to walls and floors, fill out any gaps or create interesting textures and shapes
- it is quite tricky to work with as it if difficult to direct and expands a heck of a lot more than you think it will
- leave to dry for about 24 hours
3. reshape
- the expanding foam will probably need reshaping, i found a bread knife works well for this
4. tile adhesive/grout
- cover the entire structure with tile adhesive/grout (i bought the ready mixed stuff that comes in a bucket from b+q)
- you can use a paintbrush or get messy and use your fingers!
- you will need 3 or 4 layers of this and leave each layer to totally dry before you put the next layer on
- when it feel hard enough...
5. sand and varnish
- choose your varnish
- for my bearded dragons fake rocks i have always used indoor clear quick drying varnish but for my salvator monitor i chose outdoor waterproof varnish due to the high levels of humidity in his vivarium. (the outdoor stuff smelt really bad for about a week and took much longer to dry between levels)
- dry your sand in the oven a few different colours of sand will add texture and depth to your finished rock
- paint a layer of varnish over your rocks
- sieve on the sand
- leave to dry for a bit, then shake off any loose sand
- leave to dry totally before doing the next layer (don't worry it always looks a bit crappy after the first layer, because its all patchy)
- in total you will need about 3-4 layers of sand and varnish
make sure your creation is totally dry and probably give it a week in the vivarium, set up with the lights running and glass doors open to ensure there are no varnish fumes left because they could really harm your lizard.
_________________
0.1.0 Royal Python - Wednesday - CB04
1.1.0 Bearded Dragons - Girr and Lenore - CB06
1.0.0 Cat - Ozzy |
|
| Back to top |
|
|
meko
I've settled in...
Joined: 29 Apr 2007
Posts: 35
|
| Posted: Sun May 06, 2007 2:31 pm Post subject: |
|
|
Aidan.
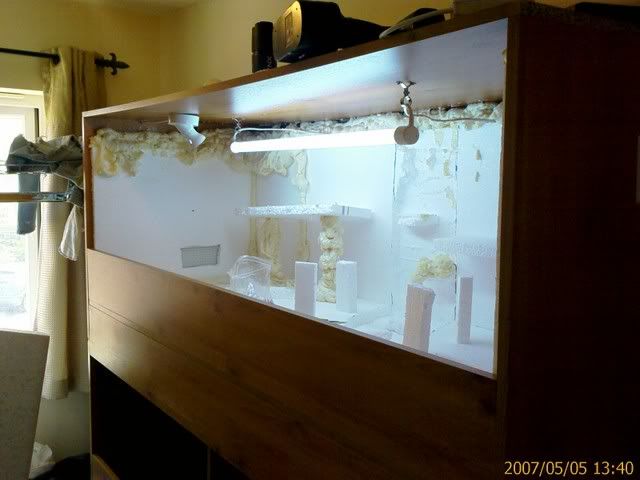
I'm currently in the middle of doing one but rather than a background i'm going for the entire thing.
I bought a pack of polystyrene sheets (£9 for 6 sheets) from B&Q and also used left over packaging from anything i had.
Cut it into shape and stuck to the sides of the viv using Asdas grab adhesive (same as no more nails but a lot cheaper!! (£1.98 a tube but you'll need the gun as well).
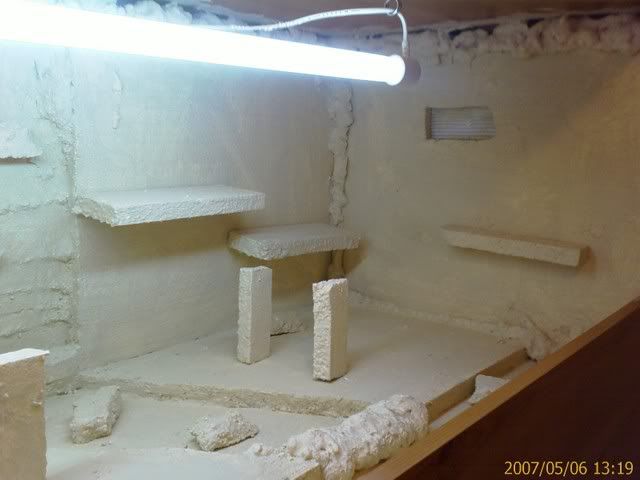
I sealed the joins with expanding foam and also put it round the top as the polystyrene wasn't tall enough. As you can see from the pics it got heavy and fell down, so hopefully when it's finished it'll look like a rock face  The expanding foam isn't cheap... about £6 for the smallest size and i went through a can of the smallest and the next size up although i did have a lot of space to fill. The expanding foam isn't cheap... about £6 for the smallest size and i went through a can of the smallest and the next size up although i did have a lot of space to fill.
for the rocks and posts used the grab adhesive to glue them to walls and floors - well i haven't yet as i wanted to put the first layer of grout on first. I also used cocktail sticks to hold them in place.
This gave me this.
Then i mixed a thin mixture of sand coloured grout. Cost about £7 from B&Q although i think i'll need at least 1 more bag.
I painted that on and the expanding foam was a bit of a nightmare to do as it's a bit awkward. I just used B&Q's Happy Shopper paint brushes at £2 for 5 (you've guessed there's a B&Q near me?)
you need to be quick when doing the grout as it sets quite quickly and gets thicker and harder to spread as time goes on.
At the minute i'm up to here.


I've got terracotta garage floor paint (mentioned in another thread as ok to use) but that's quite at expensive at £25 a tin to coat and seal it with and then i'm going to paint with PVA glue and sprinkle play sand (£2.50 for 15kg from Argos) on it in places to give more of a natural environment look. Also got a couple of slates to go in so there's a rough spot to keep nails trim.
On the top pic you can see a channel cut out of the back and bottom sheet. I'm going to paint this blue as a faux waterfall and stream with a bridge going over it. 2 reasons,
1) cos i reckon it'll look interesting
2) to make sure there's a place to get close enough to the UV (repti-glo 10.0)
Also need to make a hide, but i've got an idea involving Lego, PVA and play sand....
The viv is 5*2*2 which is part of a stack i've built. Only got 1 dragon and a gecko, the second layer is split half way) but i've built it big enough 'just in case'
 |
|
| Back to top |
|
|
aidan
Captivebred Communist
Joined: 07 Apr 2007
Posts: 1882
Location: ESSEX
|
| Posted: Sun May 06, 2007 3:29 pm Post subject: |
|
|
| thanks keep me updated with other steps |
|
| Back to top |
|
|
minno
Key Member

Joined: 08 Apr 2007
Posts: 376
Location: nottingham
|
| Posted: Sun May 06, 2007 3:57 pm Post subject: |
|
|
| also love the Carling decor in the middle shelf lol |
|
| Back to top |
|
|
aidan
Captivebred Communist
Joined: 07 Apr 2007
Posts: 1882
Location: ESSEX
|
| Posted: Sun May 06, 2007 4:31 pm Post subject: |
|
|
would a mod be able to sticky this form please as it is very helpfully and will help many others
cheers |
|
| Back to top |
|
|
meko
I've settled in...
Joined: 29 Apr 2007
Posts: 35
|
| Posted: Sun May 06, 2007 4:37 pm Post subject: |
|
|
haha, you want to see all the other photos. I did make another viv a while back but got bored of it. in almost every pic i've taken there's a can of Carling or Fosters..
The only reason the other pics i posted are alcohol free is cos i did it in the morning...
Was going to do the second layer today but a mate just phoned me, needs some backup cos his wife has all her mates round... women and beer or playing with grout? |
|
| Back to top |
|
|
minno
Key Member
Joined: 08 Apr 2007
Posts: 376
Location: nottingham
|
| Posted: Sun May 06, 2007 4:38 pm Post subject: |
|
|
| haha well u better downtools then aint u, |
|
| Back to top |
|
|
meko
I've settled in...
Joined: 29 Apr 2007
Posts: 35
|
| Posted: Sun May 06, 2007 4:40 pm Post subject: |
|
|
| tools are down.. watching the match then a few squirts of 212 on Ice and off down there!! |
|
| Back to top |
|
|
minno
Key Member
Joined: 08 Apr 2007
Posts: 376
Location: nottingham
|
| Posted: Sun May 06, 2007 4:44 pm Post subject: |
|
|
| hahaha nice choices, |
|
| Back to top |
|
|
|

